ESP Firmware Upgrade
The firmware provided here is open source. The zip file contains the two binary files needed to program the ESP8266
|
ESP8266-bridge_vF1_1.9.8 (May 2016) ESP8266-bridge_vF1_1.9.13_c (July 2016) ESP8266-bridge_vF1_1.9.17 (Aug 2016) |
This is the release for all ByVac products. It is a Serial to WiFi bridge with commands. The file contains two binary files. |
| Command details for this firmware |
Programming ESP8266 Instructions
WARNING: Updating the firmware on an ESP8266 can be difficult, sometimes it works fist time and other times it takes many tries. I don't really have any tips other than keep trying, unplugging and plugging in the USB to serial and generally persevering.
Wiring
There are many ways to download new firmware to this device, the following is probably the most reliable as it does not rely on anything other then a serial connection.
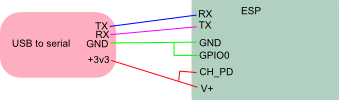

Regardless of what shape or device the ESP8266 is in, the above connections will ensure that the device is in a mode ready to accept new firmware. IMPORTANT: CONNECT GPIO0 TO GROUND BEFORE POWERING UP.
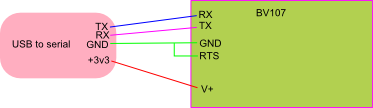
BV107
BV107_1
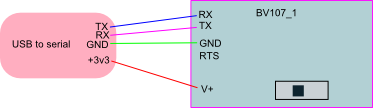
Hold button down before connecting the power
BV108
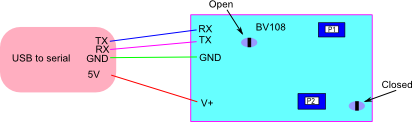
On the BV108 P1 is connected to GPIO0 and P2 is connected to the reset, so to get the device into programming mode hold down P1 and press P2, both can be then let go as the device will stay in programming mode until the power is cycles or reset (p2) is pressed again.
BV507
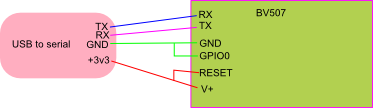
The programming interface for the BV507 is at the back see the BV507 Page. Note that the reset is held high although this is not really necessary as it has pull up resistors. It may also be necessary to remove the solder jumpers from UART pads, again see the BV507 page.
BV508_V2
The instructions for this are on the BV508 page.
BV509

The BV509 has a strip of 5 holes at 2mm spacing with one and of the holes marked with a 1 (the square hole). Make sure the U1 and U2 jumpers are open and that the Prg is closed. The Prg only needs to be closed for power up as this is connected to GPIO0 on the ESP8266
BV4115
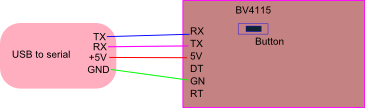
Only 4 wires required, note that the 5V line is used as the BV4115 has an on board 3.3V regulator. Push the button BEFORE connecting the power.
Step 1 Obtain the firmware & Program
Use NODEMCU software although there are other down loaders this appears to work the best. I used the windows .exe file.

First load the two binary files as above (obviously the locations will be different) using the Config menu. NOTE that only the 00000.bin is ticked initially,
Step 2 Connect
Before connecting the device to power up make sure that GPIO-0 is grounded. On some boards this will be a pin or link. On boards with a button it will be when the button is pressed. So depress the button BEFORE powering the device.
Step 3 Flash 00000

Select the correct com port and Flash for first part of the firmware, if it does not work, just keep trying, try a different USB port. It will work eventually. If still having problems try setting the Baud rate lower in the advanced section, 115200 or less.
Step 4 Flash 40000

Using the Config menus select the second part of the program and flash that.
If this works first time then great, if not you need to keep trying different combinations. Unfortunately the process can be very fickle.
Release Notes
F1_1.9.19 21 September 2016
- Fixed +++client
- Removed unnecessary code (file now smaller)
- Fixed dynamic ip, can now set IP address to 0
- New configuration screen
- If the network is not available, ESP reverts to an access point for reconfiguration