BV4619
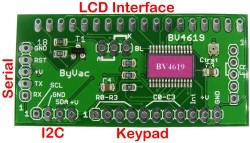
The BV4619 is an LCD charter display controller that will attach to LCD displays with a HD44780 controller or similar. It has 2 interface options, Serial and I2C and also has provision for attaching a 4x4 keypad.
Differences between BV4618 andBV4619
BV4618
3 serial interfaces, includes RS232 12V levels
Works like a VT100 display
Only one device per serial bus
One back light out put on or off
BV4619
2 serial interfaces no 12V levels
Direct LCD commands, simpler user takes care of scrolling
Addressable protocol, many devices on one serial bus
3 back light outputs, PWM dimmable
Arduino
There are two libraries for the Arduino depending on the interface. Both are for version 1.01. The libraries also contain examples.
Both use the same library functions except the constructor which is slightly different.
- lcd_cls() // clears LCD display
- lcd_rowcol(row,col) // places cursor on defined row and column, both start at 0
- lcd_cursor(type) // type=0=cursor off, type=1=cursor normal, type=2=block flashing
- lcd_print(string)
- lcd_print(integer)
- lcd_bl(red,green,blue) // see below
- lcd_defcust(address, definition) // see below
- lcd_printcust(address) // see below
Keypad
- lcd_getkey() // gets the next key scan code in the buffer, 0 if empty
- lcd_keybuf() // gets the number of keys in the buffer
- lcd_keyclear() // clears the keypad buffer
Back Light
The display controller can support up to three back lights and each output is PWM. The function will accept 0-10 for any value. For example:
lcd_bl(3,3,0) // dim yellow
lcd_bl(0,10,0) // bright green
lcd_bl(0,0,0) // back light off
This of course applies to displays that have 3 back light LED's. For 'normal' displays normally just the RED is connected.
Custom Characters
These can be defined using 8 bytes, see the various web sites for determining which bytes to use. The address supplied is from 0 to 7 and this will be used for displaying a custom character. The example in the zip files above have two custom characters defined.
User contribution
The above library stores messages to RAM, if this is a problem then the Arduino forum as a way of saving this to Flash, the details are here.
Raspberry Pi (I2C)
The BV4619 is an LCD charter display controller that will attach to LCD displays with a HD44780 controller or similar. It has 2 interface options, Serial and I2C and also has provision for attaching a 4x4 keypad. This is a demonstration of how to use the device using the I2C interface. Further information on interfacing with the RPI
Note:BV4618 shown but is has exactly the same I2C connections.
Connections
The BV4619 requires 5V if a 5V LCD display is fitted which is normally the case.
Serial
Unless you have a 3.3V LCD display this should not be used without some kind of 5V to 3.3V level shifter for the TX and RX lines.
I2C
Using the I2C interface the BV4619 can be operated at 5V and thus a low cost 5V LCD display can be used. The SDA and SCL lines are shown connected in the diagram below.
The 7 bit address for this device by default is 0x39 but this can be changed by the user.

Connect the power lines last as the I2C mode is detected by the pull up resistors that are installed on the PRi
** You may be wondering why no level shifter is required for I2C. This is because the BV4619 does not output anything on the SDA and SCL lines. The signal is created by pulling the line to ground. The high level is achieved by the BV4619 by setting the signal line to an input. The high value is therefor created by the pull up resistors within the RPi which are tied to 3.3V **
Software
The software is some very simple Python code. It is assumed that the Pi has been set up for I2C if not follow the instructions on this site. In addition the smbus module will need installing:
sudo apt-get install python-smbus
FAQ
How do I put text in an exact position?
The BV4619 directly controls the HD44780 or equivalent on the display and that gives a clue as to where to look for the answers. To move the cursor around the display a command is sent. Not all displays are the same but for the majority of 20x4 displays will respond to the following:
start of line1 = 128
start of line2 = 192
start of iine3 = 148
start of line4 = 212
As an example if the cursor needs to be moved to the start of line 2 then send command "hc192" (I2C 2,192). To move the cursor to an exact location then add the column to the command. Again as an example to move the cursor to line 4, column 6 would be 212+6=218 so "hc218" (I2C 2,218).
Any characters following this command sent with the data command, e.g. "hdfred<ent>" will start from the set cursor position.
Physical Dimensions
Current PCB
